V4 High Availability
Contents
Background
SARK HA V1 and V2 used Heartbeat and our own in-house written handlers for file replication and failover. The cluster was very reliable but limited in its ability to quickly fail-back after a protracted failover event, usually involving some level of manual intervention. SARK V4 high availability uses an openAIS stack with DRBD to create a true cluster. Whereas HA1/HA2 ran as a fixed primary/secondary pair, V4 is not particularly concerned which cluster element is currently active, except in one corner case; that of switching PRI circuits between cluster nodes during fail-over and fail-back (See the section on rhino support below). The three principle software components used by V4 HA are Pacemaker, Corosync and DRBD. In broad terms, Pacemaker is the cluster manager, Corosync is the cluster communication component (it replaces Heartbeat) and DRBD (Distributed Replicated Block Device) is the data manager. DRBD is effectively a RAID 1 device which spans two or more cluster nodes. SARK, and indeed Asterisk, know little about the cluster although both components are aware that it is running.
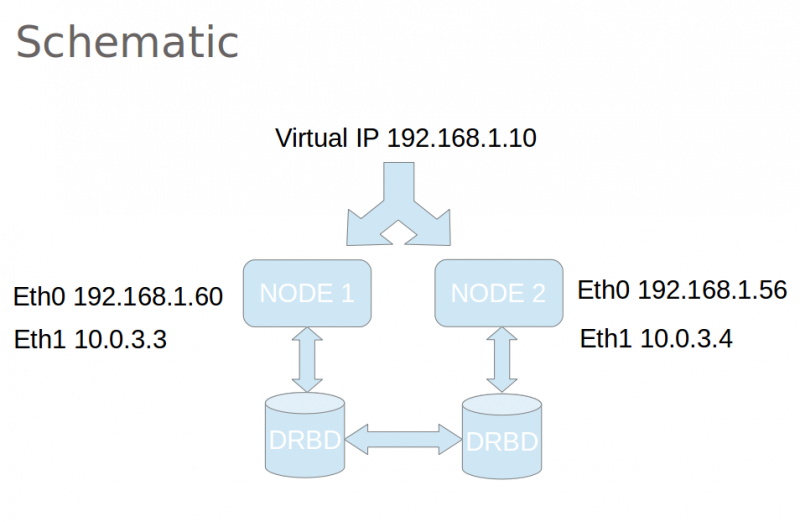
Production V4 HA nodes use a minimum of 2 NICs. Eth0 attaches to the regular LAN while Eth1 provides a dedicated point-to-point communication link between the 2 nodes. DRBD and Corosync both use this dedicated "cluster LAN" to communicate and move data around the cluster. Ideally the dedicated link should run between Gigabit NICs with a directly attached Cat5e or Cat6 cable (no switches and DEFINITELY no routing). Older NICs may require a crossover cable but most modern equipment will auto switch so you shouldn't need one.
ASHA
A scratch openAIS stack install is not for the feint-hearted. If you are unfamiliar with the components, you can spend a long frustrating time playing "whack-a-mole" with recalcitrant servers that will simply refuse to do as they're asked. If that doesn't deter you then be aware that you must also define a strategy for addressing (and moving) application data, which is now in the DRBD partition, rather than where it would normally reside.
For V4 HA, we built a little helper utility called ASHA (Asterisk SARK High Availability) which reduces the entire install to 2 commands. ASHA is a work in progress but we published it early in the hope that it may be of use. It is not a panacea and it is by no means perfect (the idempotency is suspect in a few areas) but it will get you a vanilla SARK cluster up and running in just a few minutes... which brings us to platform choices;
Platform
V4 HA runs on Debian Wheezy. It cannot currently run on SME Server (SARK's original home Distro). This is not due to any architectural limitation of V4 HA but rather the extreme difficulty of installing the openAIS stack on SME Server 8.x. It is unlikely that this will change in the foreseeable future.
HA V3 vs HA V4
- No clean-up required after a V4 fail-over/fail-back
- V4 nodes run full firewall (V3 nodes require an upstream firewall)
- V4 nodes run Fail2ban (V3 runs ossec)
- V4 fail-over is slightly slower than V3 (around 30 seconds vs 12 seconds in V3 - blame MySQL)
- V4 Node removal/replacement is much easier – nodes can be pre-prepared and sync is fully automated
- V4 clusters can detect and resolve Asterisk hangs and freezes
- V4 clusters need to be pre-planned during initial Linux install
- V3-HA upgrade to V4-HA requires a re-install
- V4 upgrade to V4-HA requires either a re-install or repartitioning (or an extra drive)
- V4 clusters can run at dynamic Eth0 IP addresses
- Rhino card support is much simplified in V4
- V4 Nodes require a minimum of 2 NICs (at least for production)
- V4 dedicated eth1 link is much faster and more robust than V3 serial link
- V4-HA requires a steep learning curve to fully understand
- V4 HA installation has been simplified with a helper utility
What does the V4 cluster manage?
- Apache
- Asterisk and ALL of its data
- MySQL and ALL of its data
- DRBD
None of these components will be available on the passive node (DRBD is running but you can't access its data partition, at least not without a fight). Even if you were to manually start any of these components (don't!), they would not see the live data.
A word of caution
Pacemaker, Corosync and DRBD are extraordinarily powerful and complex pieces of software. You need to understand them and, at least in outline, be familiar with how they work together with one another. The ASHA Utility, makes V4 installation very simple and straightforward and hides a lot of the complexity but you do need to be aware of how to recover from some of the possible failures that can occur when running a cluster. Getting it wrong, or changing parameters without rehearsal can result in data loss so you must have a clear data backup and recovery strategy for your cluster before you make changes.
Installation Prerequisites
- A minimal Debian Wheezy install (When tasksel runs you should only select openssh and nothing else)
- An empty partition on each cluster node.
- The partition MUST be exactly the same size on each node
- It should be marked as "Do not Use" when you define it.
- The partition needs to be large enough to hold all of your MySQL and Asterisk data (including room for call recordings if you plan to make them).
- By convention we define the first logical partition (/dev/sda5) as the empty partition
- A minimum of 2 NICs on each node
How big should the DRBD partition be?
DRBD partition size is a trade off between making it big enough to handle any eventuality and the time it takes to synchronize when you bring a new or repaired node into the cluster. As a rough guide, on a single dedicated Gigabit link, the cluster will sync at around 30MBs. On our own SARK systems we use a 64Gb SSD drive and we allocate 50Gb to the DRBD partition, 8Gb to root and 4Gb swap. This gives ample room for call recording with periodic offload and it syncs a new node in about half an hour. You can increase the sync speed and resilience by using extra NICs with NIC bonding if you wish but the basic install we discuss here does not provide it.
Installation
Unlike most Pacemaker install guides which describe installing the nodes in tandem the sail install proceeds one node at a time. Thus your first cluster will, somewhat paradoxically, consist of only a single node. This is perfectly fine and it actually makes the creation of the second node considerably easier because Pacemaker and DRBD will do most of the heavy lifting for you automatically.
Once you have your Debian installation, choose a candidate node and install sail V4 using the notes HERE. You may also wish to install your favourite source code editor at this point and any ancillary tools you feel you may need (tshark or whatever).
Now it is time to install the cluster. This is where we introduce ASHA (Asterisk SARK High Availability). ASHA is a little helper utility we built to set up your cluster.
apt-get install asha
ASHA will drag the openAIS stack as part of its install. It will also ask you a series of questions and use your answers to generate a set of scripts to define your cluster and fetch it on-line.
What does asha need to know?
ASHA will ask the following
- Whether this is the first node to be defined for this cluster (or a subsequent definition). The generated scripts will be different for the first and subsequent nodes.
- The virtual IP of your cluster (this will be a free static IP address on the local LAN)
- Whether you wish to deploy with 1 or 2 NICs. You should NEVER deploy a cluster with a single NIC except for learning and play.
- The IP address of the cluster communication NIC on this node (usually this will be eth1)
- The IP address of the cluster communication NIC on the other node
- The node name (uname -n) of the other node (which you may not have installed yet)
- An administrator email address for cluster alerts
- A unique identifier string which will be placed into the email alert subject line
Completing the installation
After the ASHA install completes, if you are feeling brave, you can simply run the installer
sh /opt/asha/install.sh
For the more prudent, you may wish to examine and understand the scripts before you run them. You will find them in /opt/asha/scripts and their number and contents will vary depending upon whether this is the first node you have defined for your cluster or the second. Here are the scripts for a first node install.
root@crm1:~# ls /opt/asha/scripts/
10-insert_pacemaker_drbd_sark_rules.sh	50-make_corosync_live.sh
20-bring_up_drbd_first_time.sh		70-pacemaker_crm.sh
30-initial_copy_to_drbd.sh
the scripts are run in order, lets see what they do
10-insert_pacemaker_drbd_sark_rules.sh
This script sets up the cluster communication NIC and sets the shorewall firewall rules to allow it to communicate with its peer.
20-bring_up_drbd_first_time.sh
This will bring up DRBD and (if this is the first node defined), build the DRBD filesystem
30-initial_copy_to_drbd.sh
If this is the first node, the source data (from Asterisk, SARK, MySQL) will be copied into the DRBD partition
50-make_corosync_live.sh
Does what it says. It will start the Corosync cluster communication layer
70-pacemaker_crm.sh
This script will build the Pacemaker CIB (Cluster Information Base) using the Pacemaker CRM (Cluster Resource Manager). The CRM provides an abstracted view of the underlying XML which Pacemaker uses to do its stuff. It is complex, arcane and easily broken. In general you should not touch the CIB until you absolutely know what you are doing and why. You should NEVER touch the underlying XML unless you want to end up crying in the corner of a darkened room. There is copious CIB documentation available on-line for the curious and the brave.
The Aftermath
Once you've run the scripts, your cluster will be up and running (if it isn't you can claim your refund at the door). However, nothing should look much different to before. The SAIL browser app will be running and you can use it just as you always have. Asterisk, Apache and MySQL will all be doing their stuff.
So how do we poke it with a stick to see what it does? Well, the first place to look is the Cluster Virtual Address. You should be able to browse to SARK at that address. Indeed you should make it your practice to always log-in using the cluster virtual address because you may not always be logging into the same cluster node, depending upon the current condition of the cluster (i.e which node is currently the active one).
The next place to look is the cluster status page which ASHA has installed for you. You will find it at
http://your.cluster.virtual.ip/crm_mon.htm
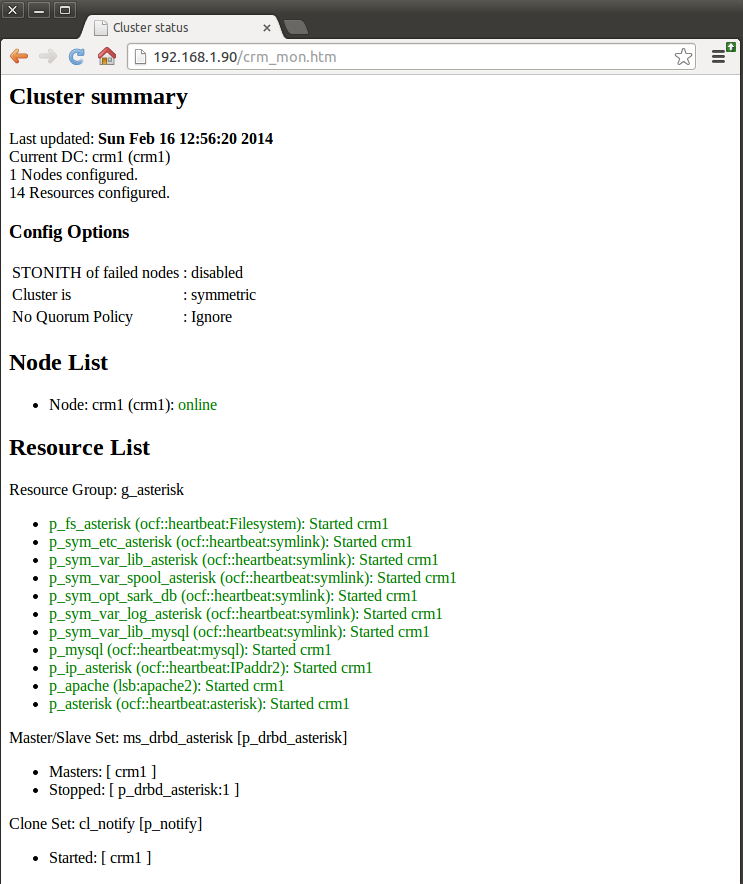
It will give you near-realtime information on the cluster status. Below is a screen shot of a single node SARK cluster which has just been brought up for the first time. The node is called crm1 (guess what the other node will be called) and the virtual IP is 192.168.1.90.
The important bits are the Node List (which tells you the names of the nodes in the cluster and their overall status) and the Resource List, which shows each of the managed resources and their individual status. The screen auto-refreshes every few seconds so you can use it to visually see what your cluster is doing.
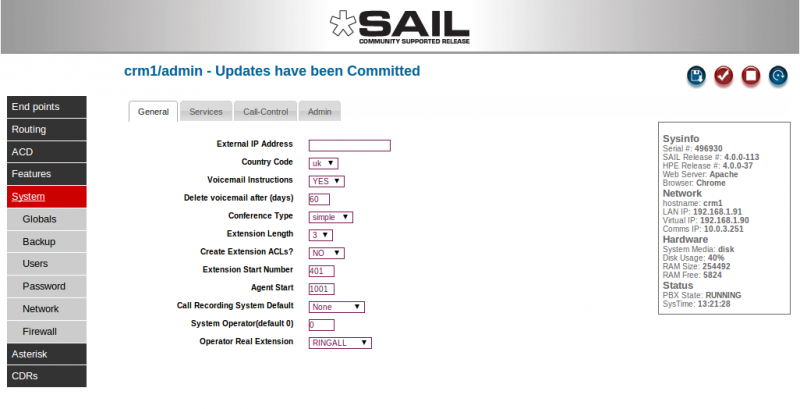
You will also see a few subtle, but important changes in the SARK browser app. If you go to the Globals panel you will notice some new information
In the information box, to the right, where there used to be a single LAN address you will now see three addresses; the LAN IP, the Virtual Cluster IP and the dedicated comms link IP.
The red Asterisk STOP button still exists but you will never see a START button if you do stop Asterisk. That's because it isn't needed. Either Pacemaker will automatically restart Asterisk for you, or it will fail-over to the other node, depending upon what mood it is in (only kidding, it will simply restart it).
The only other thing, the eagle eyed among you may spot, is that SARK no longer gives you the option to change the system Hostname in the network tab. This is because you can't change hostnames without changing the DRBD config so we don't let you do it. If you ever find you need to then you will need to read the DRBD documentation and do it yourself. It isn't particularly difficult but you have to change the config on both nodes so it isn't easy to automate.
The next step is to bring up the second cluster. The procedure is identical to bringing up the first, you just answer ASHAs questions slightly differently. ASHA will generate fewer scripts because most of the hard work has already been done. Here are the scripts from the second install
root@crm2:~# ls /opt/asha/scripts/
10-insert_pacemaker_drbd_sark_rules.sh	50-make_corosync_live.sh
20-bring_up_drbd_first_time.sh
The second node will come up and begin to sync automatically. It is important that you DO NOT dash ahead and practice power down failovers during this phase. Be patient and let it finish. For the terminally curious, you can watch the progress of the sync on either node by doing
watch cat /proc/drbd
Here's one syncing
 cat /proc/drbd
version: 8.3.11 (api:88/proto:86-96)
srcversion: F937DCB2E5D83C6CCE4A6C9
 0: cs:SyncTarget ro:Secondary/Primary ds:Inconsistent/UpToDate C r-----
    ns:0 nr:459920 dw:459664 dr:0 al:0 bm:28 lo:3 pe:1279 ua:4 ap:0 ep:1 wo:f oos:2469104
	[==>.................] sync'ed: 15.9% (2469104/2928512)K
	finish: 0:01:47 speed: 22,896 (21,876) want: 30,720 K/sec
As you can see, it is just about 16% through the sync and it is syncing at just under 23M/Sec. Above we said to expect 30M/Sec but this example is just 2 test nodes running on a VM with virtual NICs so they sync a little slower. Make me a most excellent promise right now that you will NEVER run two production cluster nodes on the same VM.
Done that?
Good.
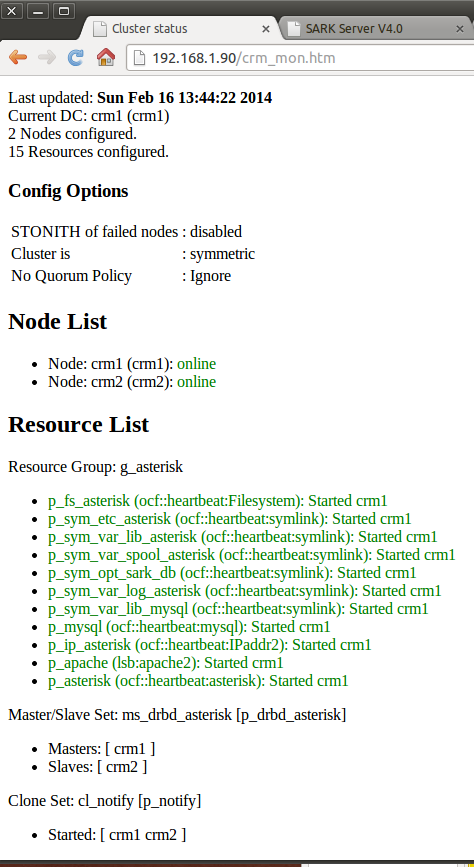
So now your cluster monitor should look like this - 2 nodes and almost ready to go.
Both the nodes are up and all of our resources are currently running on crm1. There is just one more thing to do before we are ready to start experimenting. Reboot the second node. This will ensure that Asterisk comes up in the right frame of mind for the coming foolishness.
root@crm2:~# reboot
OK, lets fire up a Linux CLI and do a couple of failovers.
If you want to watch the failover in real-time, as opposed to the near-time of the browser monitor you can run a live monitor in the CLI.
crm_mon
It looks exactly the same as the browser version but it reacts immediately to change so it's more fun to watch ("more fun to watch"? - I really should try to get out more).
So, the easiest way to force a fail-over is to log-in to the active node and take it offline (log-in it's real LAN address - because the Virtual IP will stop when you fail it over). You can fire up crm_mon on the second node (crm2 in our case) to watch the proceedings. To take the node offline execute the following command
root@crm1:~# crm node standby
If you are watching the crm monitor in real-time you will see it become very agitated. It will shut down all of the resources on crm1 and then bring them all back up on crm2 (notice how long it takes MySQL to come up - it's a bit of slug that one).
Once its all back up your cluster should be fully available, making and taking phone calls as normal (after all, this is what it's really all about).
To fetch the crm1 node back on-line do
root@crm1:~# crm node online
It will come back on-line almost immediately but no fail-back will take place. Under normal circumstances, Pacemaker will calculate the least expensive outcome in terms of time and effort so it is quite happy to leave things as they are and allow Newton's first law to prevail. If you want to fail it back you'll either need to take it off line and on line again or do a reboot. Of course, there are location rules and weightings (stickiness) you can set in the Pacemaker CIB to make certain resources "prefer" to run on certain nodes but for our purposes these seem, at least up to now, to be unnecessary. As far as we are concerned, any node will do...
Except perhaps where real copper (or fibre) telephone lines are involved..
Handling PRI lines
There are several schools of thought on the handling of fail-over with PRI (or any other physical) telephone lines. You can do what Xorcom and Digium have done, which is to place an appliance between the HA Cluster and the PSTN, this allows the cluster nodes to each talk to the appliance which in turn talks to the PSTN. Incidentally, from what we've read, both Digium and Xorcom use USB to connect the nodes to the appliance. Now, the maximum cable length of high speed USB is 5 meters so the two nodes and the appliance are all going to have to be snuggled up together in the same place; - hope you've got good fire suppression in there!
Whatever the HA implications of collocation, a cautious observer might conclude that such an appliance is just another Linux box sitting in the path and introducing another single point of failure.
A similar approach would be to connect each of the cluster nodes (via SIP) to any of the widely available SIP/PSTN gateway devices from Sangoma, Mediatrix, Cisco et al, but again these would seem, on the face of it, to present yet another complex single point of failure, albeit one that can be pretty much any distance from the nodes while allowing the nodes themselves to be physically remote to one another.
SARK V4 HA clusters can run with any SIP based PRI gateway (we tend to prefer Sangoma's Vega gateways, simply because we have more experience with those devices and we find them reliable and reasonably priced). It is less certain that V4 would run with either Digium or Xorcom's USB connected appliances. In any event it has never been tested with either of them.
What seems more interesting to us is the idea of a simple low-cost flip-flop switch which has just enough intelligence to be fired under software control and which will fail-over under power-loss (so that it will still pass a TDM signal, even when the power is removed). The Rhino 1PFO card is just such a device. It is relatively dumb, relatively cheap and it just works. The card is powered from a USB socket on one of the servers - this means that it needs to be collocated with one (and only one) of the nodes. In V4HA, it doesn't actually matter which node powers the card, but by convention we use the first node defined. The other node can be up to 100 meters away, or further if you use an intermediate switch (but you must not be tempted to route the link). With "Power-on" the card feeds the TDM signal to the node which is powering it, "Power-off" it feeds TDM signal to the other node.
Additionally, Rhino Corp. provides a C library which allows us to switch the card under program control. In practice it's dead simple. We run a little state machine on the node which the card gets its power from. It simply queries Asterisk every few seconds and waits for a response. If it doesn't get one, it switches the card signal to the other node, changes state and waits for Asterisk to reappear, at which point it flips everything back again. It's only a few lines of code but it does what we need and we get simple, effective PRI fail-over/fail-back for a fraction of the price of a big complex appliance. We can also sleep a little better knowing the nodes are in different racks in different fire zones. You could of course argue that the little Rhino card itself represents a single point of failure but the fact that even when we remove the power it still flows TDM suggests that it represents a good low-cost compromise.
To install the card simply download and build the library from the Rhino website (there's a guide in the manual). There's no deb so you'll have to compile it from source. The Make fails when it tries to install the man pages (it tries to put them in the wrong place) but you can either fix it or simply comment out the man install (what do want Man pages for anyway?)
Once it's installed plug the rhino up to the USB port on your chosen node. Use dmesg to see which USB port its on (likely /dev/ttyUSB0).
You can poke it directly from the CLI (it's all in the manual). Flip it from A to B like this
rhinofailover /dev/ttyUSB0 RELAYOFF 0
You should see the port indicator lamp move from one output port to the other on the card itself. Flip it back with
rhinofailover /dev/ttyUSB0 RELAYON 0
OK, if that all went well you are now ready to start the little watchdog daemon. First of all you must modify the asha.conf file to tell ASHA about the Rhino card. You'll find a conf file at /opt/asha/asha.conf
PRIMARY=true
USENIC1=true
CLUSTERIP=192.168.1.90
CLUSTERALERT=admin@aelintra.com
SITEID=AEL TEST CLUSTER
ANODEIP=10.0.3.251
BNODEIP=10.0.3.252
ANODENAME=crm1
BNODENAME=crm2
DRBDDEV=/dev/sda5
CLUSTERNET=10.0.3.0
IP=10.0.3.251
RHINOSPF=YES
RHINOUSB=/dev/ttyUSB0
Set RHINOSPF=YES and set the correct device address for the card. Save the config and exit. Now you can start the daemon.
cd /etc/service
ln -s /opt/asha/service/shadow
rm /opt/asha/service/shadow/down
chmod +x /opt/asha/service/shadow/run
sv u shadow
That's it, you're done. You should be able to fail-over and fail-back and the PRI circuit will follow Asterisk back and forth (with a little delay while the state machine catches up).
The service will auto start when the system reboots. You can turn it off with
sv d shadow
You can disable it so that it won't restart upon a reboot with
sv d shadow
touch /opt/asha/service/shadow/down


